If you’re using HPE Nimble storage arrays to back your VMware environment, there’s something that you should know. Lets start from the top. As of this writing, the Nimble Connection Manager (NCM) for ESXi comes in three different flavors. There’s a version available for use with ESXi 5.X, one available for use with ESXi 6.0, and one available for use with ESXi 6.5. Add the appropriate download source to VMware Update Manager (VUM), then create and attach a baseline for Nimble Connection Manager to your hosts. Doing so will ensure that Nimble Connection Manager is installed or updated during your normal VMware Update Manager update cycle which will keep Nimble Connection Manager updated across your infrastructure. For those that need them, here are the source URLs:
…Month: November 2018
How to Cleanly Uninstall Legacy NSX and Trend Micro from ESXi
So I recently migrated from a vSphere 5.5 environment to 6.5 using the migration utility. Overall, I had a great experience with a few exceptions, both of which were my fault. We’ll cover one of them in this post.
We were running Trend Micro Deep Security, which means we had NSX deployed in support of that product throughout our environment. My thinking, incorrectly, was that after the vCenter upgrade, I could upgrade the existing NSX components of the environment and I would be off to the races!
That was a mistake, and I thought it might be worth it for me to share what I saw unfolding, and how I resolved the issues. So here goes…
After the vCenter upgrade was successful, I noticed that I no longer had an NSX manager registered, which was odd. I was seeing issues with DRS, and the only way to get around the virtual machines hanging and eventually erroring out during DRS triggered vMotions was to manually migrate the virtual machines to other hosts and place the affected host in Maintenance Mode while I took steps to remove all things NSX, Guest Introspection and Trend Micro.
Here’s a step-by-step walkthrough of how I …
Configure Data Deduplication on Windows Server 2016 File Servers
If you manage a Windows Server 2016 file server and your company won’t allow Quotas or File Screening for your file server, or even worse hasn’t bothered defining data retention policies, you’ve probably found yourself running low on storage. A new feature in Windows Server 2016, Data Deduplication, can help you address the pesky problem of running low on space by, well, deduplicating your data.
What does that mean? Read the Data Deduplication Overview from Microsoft to find out what the Data Deduplication feature is, and how it can help you reclaim your sanity.
Step 1: Install the Data Deduplication Feature
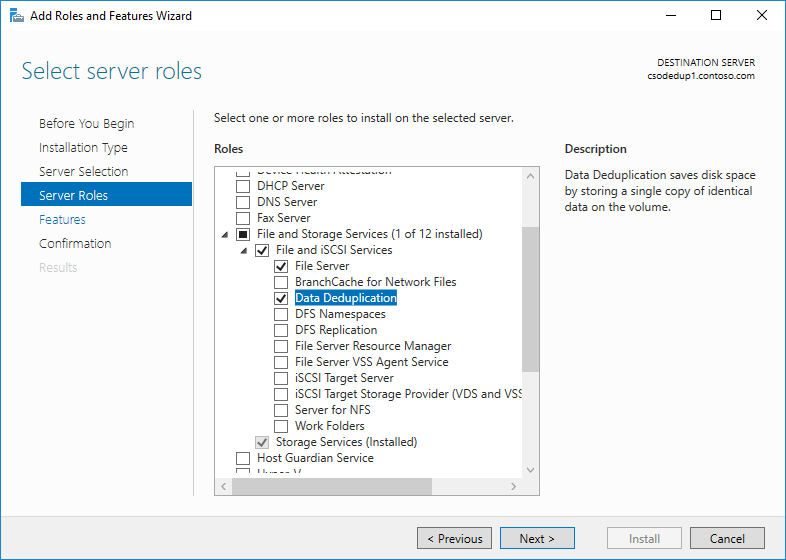
In Windows Server 2016, Data Deduplication is a role that can be installed. You’ll find the role under File and Storage Services, File and iSCSI Services.
- In the Add Roles and Features wizard, select Server Roles.
- Expand File and Storage Services.
- Expand File and iSCSI Services.
- Select the Data Deduplication role.

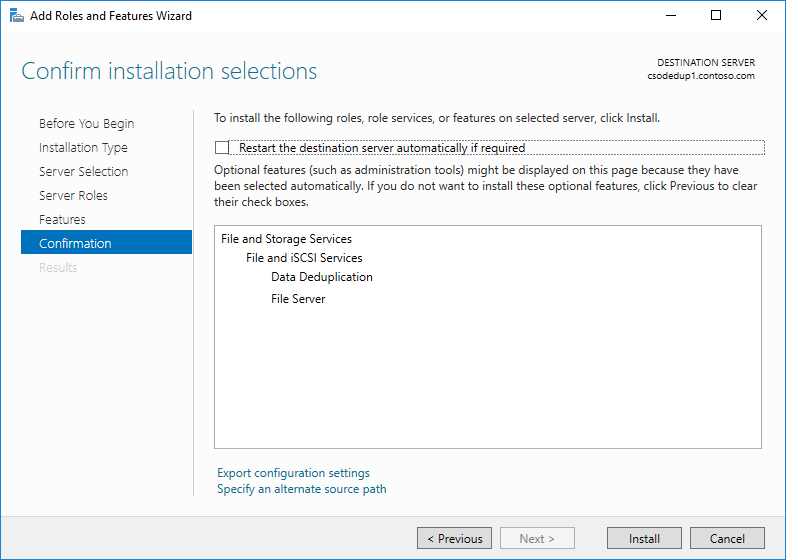
- Click Next until the Install button is active, and then click Install.

Of course, you can also use PowerShell. If you’re logged into the server you want to install the Data Deduplication role on, use this command to install the role:
Install-WindowsFeature…