We’ve all been there. You’re working to stage your VxRail upgrade and something goes terribly, horribly wrong. You’re beside yourself because you’ve got a deadline, and your upgrade is dead in the water. You’ve tried cancelling the upgrade in the GUI, but it JUST. KEEPS. FAILING.
Well, here’s what you do to get back on track.
- SSH into your VxRail Manager as mystic.
- Elevate to root using the su command.
- Run the following string of commands.
psql -U postgres vxrail -c "delete from system.operation_status where (state='FAILED' or state='IN_PROGRESS') and owner like 'Lcm%';"
psql -U postgres vxrail -c "update system.operation_status set state='FAILED' where owner='CustomizeComponentScan' and state='STARTED';"
echo '{"state":"NONE","deployed_for_public_api":false}' > /var/lib/vmware-marvin/bundle_state.jsonvxrail:/home/mystic # mv /var/lib/vmware-marvin/composite-upgrade.json /var/lib/vmware-marvin/composite-upgrade.json.old
curl -X GET --unix-socket /var/lib/vxrail/nginx/socket/nginx.sock "http://127.0.0.1:5000/rest/vxm/internal/lockservice/v1/lock"
curl -X POST --unix-socket /var/lib/vxrail/nginx/socket/nginx.sock "http://127.0.0.1:5000/rest/vxm/internal/lockservice/v1/lock/release" -H "Content-Type: application/json" -d '{"locked_by": "UPGRADE"}'
systemctl restart runjars
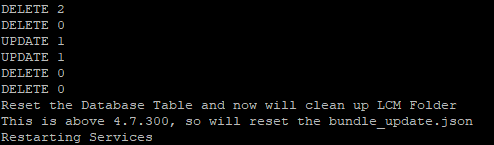
systemctl restart vmware-marvinThe result of the command above should resemble this:
DELETE 1
UPDATE 0
mv: cannot stat '/var/lib/vmware-marvin/composite-upgrade.json': No such file or directory
{"error_code": 1001, "message": "Failed to get the lock information due to the lock does not exist."}
{"error_code": 1001, "message": "Failed to release the lock due to the lock does not exist."}
If you’re not comfortable with executing that command, open …