Cancelling a Failed VxRail 7.0 Upgrade

We’ve all been there. You’re working to stage your VxRail upgrade and something goes terribly, horribly wrong. You’re beside yourself because you’ve got a deadline, and your upgrade is dead in the water. You’ve tried cancelling the upgrade in the GUI, but it JUST. KEEPS. FAILING.

Well, here’s what you do to get back on track.

  1. SSH into your VxRail Manager as mystic.
  2. Elevate to root using the su command.
  3. Run the following string of commands.
psql -U postgres vxrail -c "delete from system.operation_status where (state='FAILED' or state='IN_PROGRESS') and owner like 'Lcm%';"

psql -U postgres vxrail -c "update system.operation_status set state='FAILED' where owner='CustomizeComponentScan' and state='STARTED';"

echo '{"state":"NONE","deployed_for_public_api":false}' > /var/lib/vmware-marvin/bundle_state.jsonvxrail:/home/mystic # mv /var/lib/vmware-marvin/composite-upgrade.json /var/lib/vmware-marvin/composite-upgrade.json.old

curl -X GET --unix-socket /var/lib/vxrail/nginx/socket/nginx.sock "http://127.0.0.1:5000/rest/vxm/internal/lockservice/v1/lock"

curl -X POST --unix-socket /var/lib/vxrail/nginx/socket/nginx.sock "http://127.0.0.1:5000/rest/vxm/internal/lockservice/v1/lock/release"  -H "Content-Type: application/json" -d '{"locked_by": "UPGRADE"}'

systemctl restart runjars
systemctl restart vmware-marvin

The result of the command above should resemble this:

DELETE 1
UPDATE 0
mv: cannot stat '/var/lib/vmware-marvin/composite-upgrade.json': No such file or directory
{"error_code": 1001, "message": "Failed to get the lock information due to the lock does not exist."}
{"error_code": 1001, "message": "Failed to release the lock due to the lock does not exist."}

If you’re not comfortable with executing that command, open …

Read More

Cancelling a Failed VxRail 4.7 Upgrade

We’ve all been there. You’re working to stage your VxRail upgrade and something goes terribly, horribly wrong. You’re beside yourself because you’ve got a deadline, and your upgrade is dead in the water. You’ve tried cancelling the upgrade in the GUI, but it JUST. KEEPS. FAILING.

Well, here’s what you do to get back on track.

  1. SSH into your VxRail Manager as mystic.
  2. Elevate to root using the su command.
  3. Run the following string of commands.
psql -U postgres mysticmanager -c "delete from operation_status where state='FAILED';" ; psql -U postgres mysticmanager -c "delete from operation_status where state='IN_PROGRESS';" ; psql -U postgres mysticmanager -c "update virtual_appliance SET upgrade_status='HAS_NEWER' where component_id='VXRAIL_SYSTEM';" ;psql -U postgres mysticmanager -c "update virtual_appliance SET upgrade_status_response=null where component_id='VXRAIL_SYSTEM';" ;psql -U postgres mysticmanager -c "DELETE FROM composite_upgrade;" ;psql -U postgres mysticmanager -c "DELETE FROM operation_lock;" ;echo "Reset the Database Table and now will clean up LCM Folder" ;rm -rf /data/store2/lcm/* ;echo "This is above 4.7.300, so will reset the bundle_update.json" ;echo "{\"state\":\"NONE\",\"alerts\":[]}" > /var/lib/vmware-marvin/bundle_state.json ;echo "Restarting Services" ; systemctl restart vmware-marvin;systemctl restart runjars

The result of the command above should resemble this:

If you’re not comfortable with executing that command, open up a support ticket with Dell EMC …

Read More

VxRail Composite Package Fails to Upload or Unpack

We’ve all been there. You’re staging your VxRail upgrade and the composite package fails to upload or unpack. You can use the commands below to find temporary files on the VxRail Manager appliance and remove them if you don’t have enough space to unpack them during the upgrade process.

This command will find all temporary files larger than 20MB.

find /tmp -type f -size +20000k -exec ls -lh {} \; | awk '{print $9":"$5}'

These commands will give you the total space used by logs, and find all log files older than 30 days.

du -sh /var/lib/pgsql/data/log

find /var/lib/pgsql/data/log -mtime +30 -exec ls -lh {} \; | awk '{print $9":"$5}'

Once you’ve found all of the logs older than 30 days, you can use this command to remove those logs.

find /var/lib/pgsql/data/log -mtime +30 -exec rm {} \; | awk '{print $9":"$5}'

This command will find all files larger than 200MB.

find / -type f -size +200000k -exec ls -lh {} \; | awk '{ print $9 ": " $5 }'

Of course, if you’re uncomfortable doing any of this – contact Dell VxRail support and have them walk through it with you. Don’t get caught deleting something accidentally.

Spread

Read More

How to Find a Dell EMC Model and PSNT on VxRail Appliances

You can find the Model and PSNT on the luggage tag at the front of a VxRail Appliance. If you’re looking for a way to get the Model or PSNT remotely, check out one of the following methods.

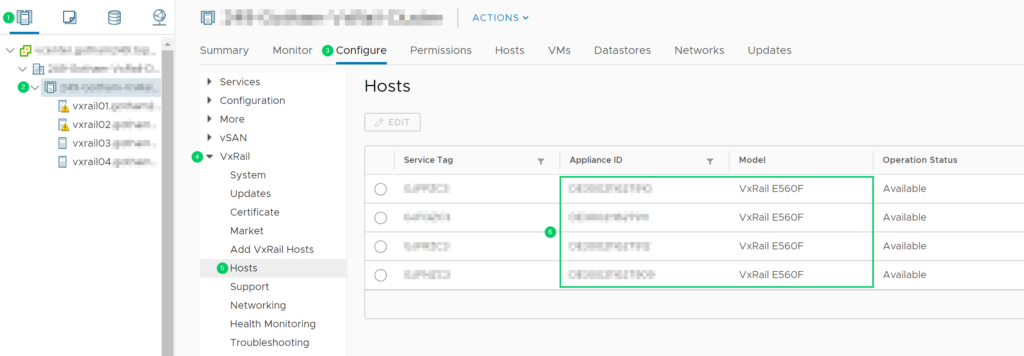
You’ll find the Model and PSNT for each VxRail Appliance in the VxRail Plugin for vCenter. Navigate to Hosts & Clusters > Cluster > Configure > VxRail > Hosts.

Finding the Model and PSNT using the VxRail Manager Console

Once you’ve connected to your VxRail Manager as mystic, run the following bit of code.

psql -U postgres mysticmanager -c “select sn,name,psnt from node;”

Finding the Model and PSNT using the ESXi Console

Once you’ve consoled to the VxRail appliance, run the following command if you’re looking for both the Model and PSNT.

opt/dell/DellPTAgent/tools/ipmitool_static fru print 17

If, for some reason, the location of the ipmitool changes in a future version, run this handy command to find the new location.

find /* -name ipmitool_static

If you’re only looking for the PSNT, the first section of the Local Datastore name on each VxRail Appliance includes the 14 character PSNT. Run the following command if you’re just looking for the PSNT.

df -h

Read More

How to Find a Dell EMC Service Tag on PowerEdge Servers and VxRail Appliances

You can find the Service Tag on the luggage tag at the front of a PowerEdge or VxRail Appliance. If you’re looking for a way to get that Service Tag remotely, check out one of the following methods.

Finding the Service Tag in the vCenter UI

PowerEdge Servers

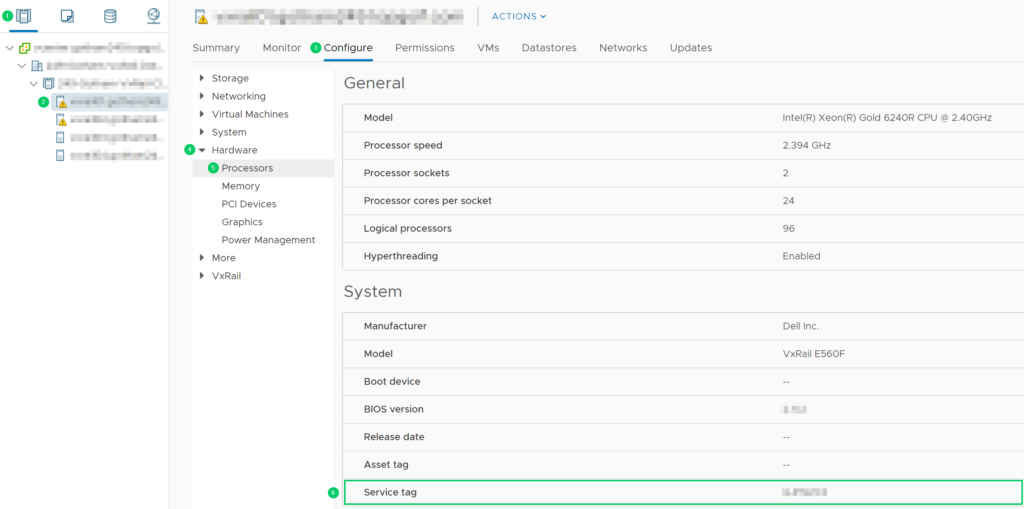
You’ll find the service Tags for each Power Edge Server by navigating to Hosts & Clusters > Cluster > Configure > Hardware > Processors.

VxRail Appliances

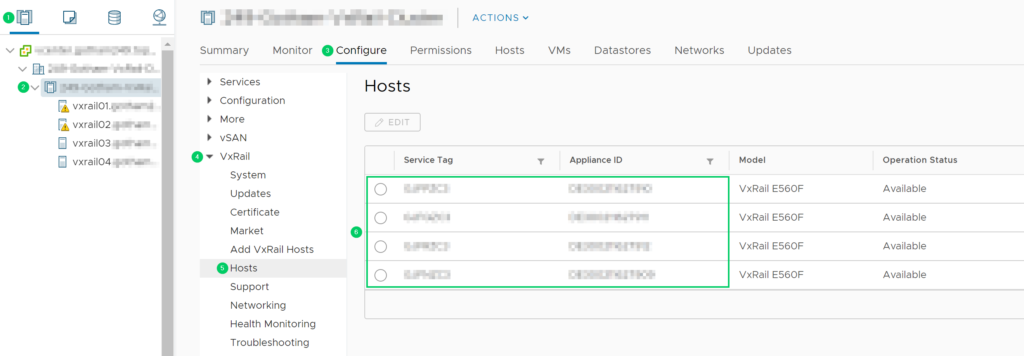
You’ll find the Service Tags for each VxRail Appliance in the VxRail Plugin for vCenter. Navigate to Hosts & Clusters > Cluster > Configure > VxRail > Hosts.

Finding the Service Tag using PowerCLI

Once you’ve connected to your VxRail vCenter, run the following bit of code. Get-Hosts -Server VxRailManager_IP -Username administrator@vsphere.local -Password <Password> |ft sn, hostname

Finding the Service Tag using the ESXi Console

Once you’ve consoled to the PowerEdge Server or VxRail appliance, run the following command. /opt/vxrail/tools/ipmitool fru print 17
Spread the love!

Read More

Access a Dell EMC 14G iDRAC Using the USB Console Interface

Deploying infrastructure over the years has exposed some pretty useful shortcuts. It’s tedious to program an iDRAC using the front LED. Sometimes, unconfigured network switches hold up the entire configuration process. This method will allow you to hook up a USB console cable and control your iDRAC directly, which can be a life saver and makes configuration and deployment much easier and without the need for a network connection.

  1. Connect your laptop to the USB Management Port on the front of the PowerEdge or VxRail.
  2. Wait for your laptop to install the appropriate drivers.
  3. The USB interface on your laptop will be assigned an IP address of 169.254.0.4.
  4. Open the browser of your choice.
  5. Browse to https://169.254.0.3, which is the IP address assigned to the iDRAC USB interface.
  6. Log into the iDRAC as root.
Spread the love!

Read More

Dell EMC VxRail 4.7 Default Password List

Recently, I’ve had to factory reset a few VxRail nodes for some testing I’ve been doing and I thought it might be a good idea to publish the defaults that Dell EMC uses for VxRail running 4.7 code.

ComponentNetworking ConfigurationUsernameDefault Password
BIOSN/AN/Aemcbios
iDRACDHCProotcalvin
ESXi rootDHCProotPassw0rd!
vCenter Server ApplianceDefined at deploymentrootvmware
Platform Services ControllerDefined at deploymentrootvmware
vRealize Log InsightDHCProotPassw0rd!
VxRail Manager192.168.10.200rootPassw0rd!
VxRail Manager PluginDefined at deploymentrootPassw0rd!
VxRail Manager mysticVxRailManager@201602!
VxRail Manager Plugin mysticVBManager201415!

Hopefully this helps someone out there!

Spread the love!

Read More

Flea Draining Equipment

I recently had someone ask me about flea power, or electrostatic discharge. I thought it might be useful for some to go over what it is, and how to drain it. This little procedure can be the magic touch that gets a piece of hardware up and working again.

So first, what is flea power in computer equipment?
Flea power is the residual static electricity that remains on electrical components (like the capacitors on a motherboard, for example) the computer even after it has been powered off, even if a battery has been removed.

What symptoms are typical?
This gets a little tricky. I’ve personally seen issues where a server refuses to power on. A good rule of thumb is, if you can power the server down to troubleshoot any issue with any component, a flea drain may help you resolve issues with bad power causing inconsistencies with the components.

Now, how do we fix it?
This part’s easy. Enterprise components are designed to remain powered on 24/7 but when you face an issue, a Reset of your device can make things work. There are 3 levels of Reset, all defined below. In order, you should try to …

Read More

Dell EMC VxRail 4.5 Upgrade Process: The Aftermath

Part 1: Dell EMC VxRail 4.5 Upgrade Process: Before We Begin
Part 2: Dell EMC VxRail 4.5 Upgrade Process: Upgrading the Cluster
Part 3: Dell EMC VxRail 4.5 Upgrade Process: The Aftermath

In the final post in this 3-part series, we cover some of the things that need to be done post upgrade for a VxRail 4.5 cluster.

Cleanup Process After a Successful Upgrade

  1. Log into the vSphere Web Client.
  2. Navigate to Hosts and Clusters.
  3. Delete all snapshots from the VxRail Manager service VM.
    1. Right-click the VxRail Manager VM, select Snapshots > Delete All Snapshots.
  4. Delete all snapshots from the vCenter Server Appliance service VM.
    1. Right-click the vCenter Server Appliance VM, select Snapshots > Delete All Snapshots.
  5. Delete all snapshots from the Platform Services Controller service VM.
    1. Right-click the Platform Services Controller VM, select Snapshots > Delete All Snapshots.
  6. If changes were made to avoid vSAN timeout issues during the upgrade process, change the following Advanced System Setting when the upgrade is complete.
    1. Navigate to Hosts and Clusters.
    2. Select the first node in the cluster.
    3. Select Configure > System > Advanced System Settings.
    4. Locate the VSAN.ClomRepairDelay setting.
    5. Change the current value of

Read More

Dell EMC VxRail 4.5 Upgrade Process: Upgrading the Cluster

Part 1: Dell EMC VxRail 4.5 Upgrade Process: Before We Begin
Part 2: Dell EMC VxRail 4.5 Upgrade Process: Upgrading the Cluster
Part 3: Dell EMC VxRail 4.5 Upgrade Process: The Aftermath

In Part 2 of this 3-part series, we’ll cover the actual upgrade process for your 4.5 VxRail cluster and how to monitor that upgrade so you don’t end up pulling your hair out.

Upgrading the VxRail Cluster

Local Upgrade Process

The local upgrade process is preferred, because it stages the upgrade to the VxRail Manager before proceeding with the upgrade.

  1. Log into the VxRail Manager.
  2. Navigate to the CONFIG page, and click on the System tab.
  3. Click the Local Upgrade button.
  4. In the Open File dialog, navigate to the VxRail Composite Bundle previously downloaded and saved locally, and then click Open to upload it to the VxRail Manager.
  5. Once the upgrade is staged to the VxRail Manager, click on the Continue button to begin the upgrade.
  6. When prompted, enter the required credentials for the vCenter Server local administrator account, the VxRail Manager root account, the vCenter Server root account, and the Platform Services Controller root account, and click the Submit button.

Internet

Read More

Dell EMC VxRail 4.5 Upgrade Process: Before We Begin

Part 1: Dell EMC VxRail 4.5 Upgrade Process: Before We Begin
Part 2: Dell EMC VxRail 4.5 Upgrade Process: Upgrading the Cluster
Part 3: Dell EMC VxRail 4.5 Upgrade Process: The Aftermath

In Part 1 of this 3-part series, we’ll address what to do prior to kicking off an upgrade of your 4.5 VxRail cluster. There are a few “gotchas” I’ve run into in the past that I address here. Hopefully it’s helpful.

Generating the SolVe Upgrade Procedure

  1. Log into Dell EMC SolVe Online.
  2. Select All Products from the menu.
  3. Click the VxRail Appliance button.
  4. Click the Software Upgrade Procedures link.
  5. Select the model of the VxRail appliances being upgraded, and click the Next button.
  6. Select the VxRail software version currently installed on the VxRail appliances being upgraded, and scroll down.
  7. Select the VxRail software version targeted for installation on the VxRail appliances being upgraded, and click the Next button.
  8. Click the Generate button to generate an upgrade procedure.
  9. Save, open and read the procedure thoroughly once it has been generated.
  10. Download the VxRail Composite Bundle for the version of software targeted in the upgrade.

Before Upgrading the VxRail Cluster

  1. Log into the vCenter Server Appliance Management Interface using

Read More

Add Download Sources to VMware Update Manager (VUM)

An ESXi host can have custom vSphere Installation Bundles (VIBs) installed. Typically, this includes things like third-party drivers or management agents. In some cases, you may want to manage those installed drivers or agents with VMware Update Manager (VUM) to deploy a specific known-good configuration across a cluster with ease. Here’s how you add 3rd party download sources to VUM in vCenter:

vSphere Web Client (Flex)

  1. On the vSphere client home screen, click the Update Manager icon.
  2. On the Configuration tab, click Download Settings.
  3. Click Add Download Source.
  4. Enter the Source URL for the Download Source you want to add.
  5. Click OK.
  6. Click Download Now to upload the package, then click Apply.

vSphere Client

  1. On the vSphere client home screen, click Menu, then Update Manager icon.
  2. On the Settings tab, click Patch Setup.
  3. Click New to create a new download source.
  4. Enter the Source URL and Description for the Download Source you want to add.
  5. Click OK.
  6. On the Settings tab, click Patch Downloads.
  7. Click Download Now to download new patch definitions.

Not every manufacturer supports integration with VMware Update Manager, but here’s what I could find.

3rd Party Download Sources for

Read More

SQL Server on VMware vSphere Best Practices: Host, Disk, CPU and Memory Considerations

Part 1: SQL Server on VMware vSphere Best Practices: Host, Disk, CPU and Memory Considerations
Part 2: SQL Server on VMware vSphere Best Practices: Availability Group, Licensing and Other Considerations

I realized recently that I never documented my process for designing high-performance Microsoft SQL environments on VMware vSphere. For the most part, what you’re about to read is a brain dump, and is intended to serve as an outline. Please make sure that you research all of the configurations for your specific deployment requirements, rather than take everything I say and dump it in to your shiny new Microsoft SQL environment. In Part 1, we’ll dive into some of the more common settings and configurations that are done in a virtualized SQL environment.

ESXi Host Considerations

Power Management

A good rule of thumb is to set Power Management to High Performance on the ESXi host. This needs to be done both in the BIOS and from within the vSphere Client to take effect.

Second Level Address Transaltion (SLAT)

It’s necessary that the host supports Second Level Address Transaltion. Most 64-bit processors support this technology. When referencing Intel processors, SLAT = Extended Page Tables. When referencing AMD processors, SLAT

Read More

The Gamification of VMware Hands-on Labs – Meet Odyssey

Sometimes digging in and learning about all the newest things in the VMware arsenal can feel tedious and daunting. VMware apparently heard our cries, and introduced VMware Odyssey at VMworld 2019. Odyssey aims to be a brand-new approach to evaluating and learning the VMware catalog.

How is it a brand-new approach, you ask? Simply, they’ve added gamification elements to the VMware Hands-on Labs that we know and love.

VMware Odyssey is a series of 15-minute tasks that challenge your knowledge and expertise across the entire VMware portfolio. VMware developed a game engine that will automatically check that a Hands-on Lab task was completed correctly, and it gives you instant feedback. There’s even a leaderboard to see how you stack up to others that have taken the Odyssey-enabled Hands-on Labs. Check out this video to learn more:

Not bad, eh? Expect to see more from the VMware Odyssey team in the future.

Spread the love!

Read More

VMware Ports and Protocols Tool

If you’re tired of pouring through VMware documentation to find specific port requirements for their software like I am, this post is going to be a god-send for you. With VMware announcing new features, products and services regularly, it can be hard to keep up with what software and version have specific requirements that you need to deploy to make everything work well. VMware offers a little-advertised tool to help you discover, digest and retain all of the ports and protocol information. I don’t think it’s been around long, since I just discovered it this year. If you haven’t seen it…

Allow me to introduce the VMware Ports and Protocols website. The site is mobile friendly, and pretty intuitive.

This tool allows you to select specific software suites, and displays the required ports and protocols for you to make it easy for you to understand your networking requirements before you deploy anything at all. There are even export options. You can download Excel or CSV formatted files, and print the results. Here’s an example of the output:

Spread the love!

Read More